Showing posts with label halloween. Show all posts

Sunday, 25 October 2015

Newborn Snail Costume

My daughter is now almost 10 weeks old but she really is the most tiny baby (still only just 5lb) so finding a Halloween costume to fit her this year was pretty impossible. I set myself a task of creating my own but it had to be something simple enough that I could fit it in between the little ones feeding, sleeping, pooing...you get the idea. Then it hit me that since she already had a woodland themed room it would be great to use that as the background and that's when I thought of a snail costume.

This costume really is simple. I completed it in half a day but it only took about an hour in total to pull together. I'm so chuffed with the results and hope that it helps someone else out how is stuck for a quick and cute costume this Halloween.


What you'll need:

1/2 meter of Jersey Material (I chose grey but you can be more adventurous if you want)
1/2 meter of any other material for the shell
bubble wrap (or another very light material)
Fabric snap fasteners or velcro
sewing machine

NOTE: you might need more or less material depending on the size of your child

Step 1 - The Hat


Step 2 - The Body


Step 3 - The Shell


And if you are felling really adventurous, you can create a little woodland scene for some super cute photographs.


I've also created a image tutorial card that you can easily share and store the instructions


I'll be back,

Wednesday, 29 October 2014

Easy Halloween Lantern

This lantern is super quick and easy to do
Perfect for those who need some last minute Halloween decorations


I opened my Cricut Craft Room today to find I had a new free cartridge - 3D lanterns and I love to try out anything new so I set to work straight away

Now I think this is how you are mean to use these images but my way is even quicker and lets you use real candles, rather than fake ones

Cricut 3D Lanterns in an assortment of cardstock. Translucent layer is tracing paper.
Taken from Becky Baugh on Pinterest


What you will need:

Jam Jar
Black Card
Tissue Paper
Sellotape or Glue
Cricut with 3D lantern cartridge

Step 1:

Measure the circumference & height of your jam jar. Then take one of the lantern images and expand it in Cricut Craft Room until it is slightly larger than your jar (as you want it to overlap a little)

Step 2:

Take your black card and cut out the lantern image using your Cricut

Step 3:

Cut out a piece of tissue paper that is slightly smaller than the size of your cut of black card and stick it to the back so the tissue shines through

Step 4:

Wrap the card round the jar so the black card is on the outside and the tissue is against the jar, then tape the overlapping edges of black card together so that it forms a cylinder around the jar.

Step 5:

Drop your tea light inside and light it - making sure you keep the flame away from the paper!!!!


Easy peasy and super effective for any Halloween household!

I'll be back,


Sunday, 12 October 2014

Cutest Baby Costumes EVER!!!

Today I am looking for inspiration before I immerse myself into the world of costume making for kids. I've scoured Pinterest and I thought I would share my favourites with you!

Queue the "AWWWWWWWS" - there are no more words

Baby Duck - Homemade costumes for babies


If you can find a baby grow with a hood then this is an easy costume to get started with - remember Barney was purple so think colourful :)


I love this Kermit costume, pretty simple but sooo effective and it's an easy one for your little one to move around in as well

Kermit the Frog - Homemade costumes for babies


In contrast this one isn't as easy to move in but gosh isn't it gorgeous...and if you baby is too young to move anyway then don't let that put you off!! I love the colours in the wing and guess this could be adapted into an owl as well

Flamingo


Every time I see this costume I just start singing "Because I'm happy..." and isn't that just what your little one should make you want to sing


If I ever get pregnant I'll be suffering from withdrawal symptoms from sushi - so much so I might end up making this costume whist pregnant!

DIY sushi Halloween costume for babies


This costume is too cute but I can see it being a bit frustrating for your little one when they can't move any more


Gizmo is the perfect choice for all those who get geeky over movies. This costume is super cute and will keep your baby cosy in the cold autumn weather (or at least it is cold for us Scottish folk!!)

GIZMO - Homemade costumes for babies


and I couldn't show Gizmo without sharing this cutie! Marshmallow man is one of the more difficult costumes on my list but I think you'll agree the results are worth it


Have another bun in the oven? Well this is a cute way to match yourself to your wee one so that both kids can take part in the fun

skeleton siblings


And if you want to go all out then start sourcing those feathers and get crafting to make this piece of art. 
You're baby would definitely be belle of the ball!!


I'll be back,

Friday, 1 November 2013

Last Minute Halloween Decorations

Having a Halloween party tomorrow? running out of time to get things really? Well here are a few quick tutorials to make sure your party goes off without a hitch!

Last weekend I threw a Halloween party but it had been a long week at work and I had to rush Friday night and Saturday morning to get everything ready. Halloween crafting doesn't need to be difficult though so I quickly pulled together a few ideas and gave them my best crack with thinks I had lying around the house...


I used this ghost tutorial and used a cheap wreath I had bought for Christmas, which I wrapped in black material and added bats and a boo sign for a spooky welcome message! Best thing was that I didn't actually need to glue anything to the wreath so I can unwrap it all and still use it for Christmas.

floating cheesecloth ghost     


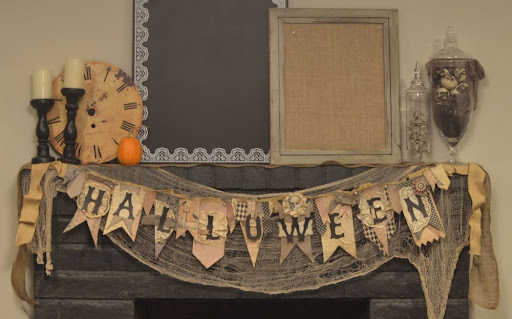
You have already seen my wallpaper bunting but this was great to jazz up the walls a bit.


These ravens were soooo cheap and easy to do. I just drew one raven as a template and then cut round it to make the others. I did some bats as well for an extra spooky feel.


To add a bit of atmosphere to the place I made these mummy candle holders using a bandage from my first aid kit, a jam jar and a couple of googly eyes which were in my sewing box (but you might have some stuck on one of your old birthday cards)


Halloween Crafts 2 15     


I had a friend coming who can't eat gluten or wheat so I wanted to make a cake she could eat, unfortunately it was so hot in the flat that it melted before see arrived and then after I cut one slice off, the cat jumped up and started licking it - typical! At least my mate got a piece.
I used this tutorial for the design and then used my cake angels book for the recipe. 


This was my favourite decoration! this creepy hand print was really easy to make and only needs PVA glue and some food colouring - easy peasy!!


Once the guests got in the mood we started playing a part game that had tricks for the losers and treats for the winners.

We had alcoholic test tube shots (pink for treats and green for tricks)

Blood-Orange Cocktails     

And for those who weren't drinking - we had spider lollies which I'd already bought on Amazon (cookies and cream for the treat and BEER flavour for the trick)


So hopefully these will help you out before tomorrow night and hope you all have an amazing time.
HAPPY HALLOWEEN


 I'll Be Back xx


Tuesday, 22 October 2013

Wallpaper Bunting

So you have maxed out your Halloween budget on your costume and you still have to decorate your house before your friends turn up. This tutorial will show you how to make a really cheap and simple bunting that you can jazz up your living room for any occasion!!


Materials

  • wallpaper samples (you can pick these up for free at any DIY store)
  • scrap of cardboard (but you can use a piece of wallpaper if you don't have any)
  • twine or ribbon
  • double sided tape
  • pencil
  • scissors

Step 1 - Make your template

Draw your design on your scrap of cardboard. I use a diamond kind of shape so that you can fold the top over the twine. Carefully cut out your template and put it to one side.


Step 2 - Draw your flags

Unroll your wall paper and place your template on the underside. Draw round your template and repeat the process until you can't fit any more on your piece of wallpaper


Step 3 - Cut out your flags

 Then cut out each of the flags and separate them into piles of the same design. Mine were a bit curly from the wallpaper being rolled so I lay books on top of them for a while to flatten them.


 Step 4 - Add flags to your twine

Taking 1 flag at a time, place a piece of double sided tap just under the largest part of the flag, then place your twine on top, before folding the flag over the twine. Repeat the process until you get your desired length.


Step 5 - Hang your bunting

it really is that simple - all that's left is to hang your bunting for your friends to admire. The best bit is you can easily remove the flags and reuse the twine for new bunting to match your next occasion.


About This Blog

About This Blog
A blog for fun and unusual Craft tutorials This year I will be learning a new craft every month - if there is a craft you would like to learn, let me know

Search This Blog

Featured Post Via Labels

Instagram Photo Gallery