Showing posts with label kids. Show all posts

Monday, 19 October 2015

Fun Snacks for Kids


It can be difficult to get your little ones to choose a healthy snack over a sugary option but these butterfly snack bags will get them excited about fruit and veg, as well as being an easy way to transport food on a day out or for a kids party.

What you will need

sealable sandwich bag
peg
pipe cleaner
googly eyes
double sided tape
choice of snacks

Step 1 - Store your snack

Open your sandwich bag and put snacks into both bottom corners. Its up to you if you mix your snacks up or leave them separated on opposite sides like mine. Seal the sandwich bag, making sure you push out all the air out before you seal it, and then twist bag in the centre and put the peg over it.

Step 2 - Give your butterfly a face

Take your pipe cleaner and fold it in half then roll in the ends until it looks like the photo above. Then pinch it in the peg to give you the antenna. Finish off the face by stick your googly eyes on the front of the peg

Step 3 - Optional extra snack

I wanted to add a little something extra to my snack so using some double sided sticky tape I attached a mini cheese block to the back of the butterfly but you could use other sealed snacks like raisin boxes or yoghurt tubes.


Enjoy your snack and hopefully the 5 minutes of piece and quite you get while your child is eating.

I'll be back,


Sunday, 5 April 2015

Hand Print Flower Collage

This spring I was lucky enough to spend the start of spring with 4 lovely girls in the Bell Household and we set to work making this lovely piece of art! It really is super simple to make, even the 3 year old twins were able to get involved so keep your kids busy in the holidays and give it a go this Easter!


What you will need:

Canvas  - I got mine from The Works but you can get smaller ones in Poundland
Blue Tissue Paper (or whatever colour you want your background to be)
Green Card
Card to match your background colour
Glitter
PVA Glue (lots of it)
Scissors
Thick kids paint brushes

Step 1 - Get those hands messy

You'll need about 6 hand prints so split the hand prints between the number of children you have taking part.

Give each child a piece of card (the colour that will match your background) and then get them to put their hand prints on it. I did this by letting them put some paint on a paint brush and then colour in their hand before pressing it on the paper. I also let the kids pick their own coloured paint (which quickly backfired when they all copied each other but they were happy)

Put these hand prints to the side and leave them to dry

Step 2 - Create your Tissue Paper Collage

Start by asking the kids to tear the tissue paper up into lots of small pieces and make a pile in the middle of the table. This bit went down a treat but make sure it doesn't get crumbled into balls otherwise you will struggle with the next bit.

Clean a paint brush and use it to cover the canvas in a thin layer of PVA. Then start layering the tissue on top - you can either do all the same colour like us, or do a multicoloured collage.

Then put another thin layer of PVA over the top, as this will make the background shiny when the glue dries. Don''t worry if the tissue tears, you can always layer more tissue over the top.

Step 3 - Cut your stems

Take the green card and cut enough strips for your flowers. Then stick these strips in the centre of your canvas, grouped together at the bottom. You won't need any more glue if your canvas if still sticky but if it's already dried then just add a bit more to the back of the stems.

Step 4 - Let the flowers bloom

Take the hand prints you made earlier and cut around them before sticking them on the top of each of the stems

Step 5 - Plant your flowers

Cut a spare piece of card to the shape of a plant pot and then cover in it PVA glue. take your glitter and shake across the top to cover

Top Tip - lay another piece of card under your plant pot of that you catch the excess glitter and then can gently fold the card to funnel it back into the glitter pot

Finish your picture by gluing the pot over the bottom of your stems and that's you done! 


Told you it was easy and it's a great way to show off not only your kids art skills but their hand prints as well, rather than one of those generic kits you can by in the shops!!!!

I'll be back,


Sunday, 30 November 2014

Paint Swatch Christmas Cards


This is a great one to do with the kids, especially when they are school age and need to take loads in for their friends / teachers!!

What you need

  • Paint swatches (I picked mine up from Homebase but most DIY/paint stores have them)
  • Blank cards or sheets of card folded
  • Christmas Text 
  • Buttons
  • Sequins
  • PVA glue

Instructions


Step 1 - Select your swatches

I walked into Homebase and had so much choice that my Christmas trees were almost purple but in the end I stuck with green and brown. However, if you want to be more adventurous and give everyone a different coloured tree, then go for it!

If you can't get your hands on any then coloured card will do the same job.


Step 2 - Cut out your tree

Cut a triangle from your swatch. I ended up having to cut this tree in half as it was too long for my card but you can adjust this to whatever works for you. I like a range of different sizes so they don't all look the same.


Step 3 - Plant your tree

With a few dabs of glue on the back of your tree, stick it to the front of your card. I used a ready made pack of blank cards I already had in the house but you can just buy sheets of card and fold/cut them to the size of your choice.

I also cut a small piece of the brown paint swatch to use as the base of the tree, also gluing it onto the card.


Step 4 - Add sparkle

For some reason I also had a tub of sequins in the flat that had snowflakes and stars (as well as some dinosaurs and cats mixed in - don't ask) so I was able to glue a few of these around the tree to add a bit of sparkle. Circle sequins or sticky gold stars will have the same effect though.


Step 5 - Add your Christmas Message

Print out your Christmas message. I've attached a sheet full of Merry Christmas labels for you to use but feel free to come up with your own.

Glue this onto the bottom of your card and then a button on either side or use more sequins / stars to finish it off.


I'll be back,

Sunday, 12 October 2014

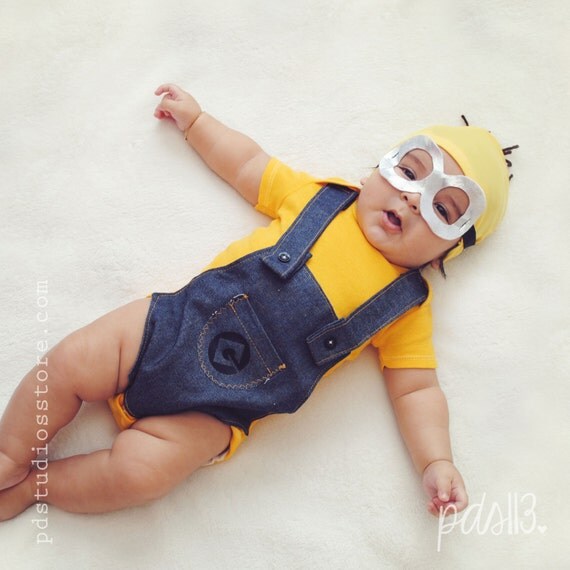
Cutest Baby Costumes EVER!!!

Today I am looking for inspiration before I immerse myself into the world of costume making for kids. I've scoured Pinterest and I thought I would share my favourites with you!

Queue the "AWWWWWWWS" - there are no more words

Baby Duck - Homemade costumes for babies


If you can find a baby grow with a hood then this is an easy costume to get started with - remember Barney was purple so think colourful :)


I love this Kermit costume, pretty simple but sooo effective and it's an easy one for your little one to move around in as well

Kermit the Frog - Homemade costumes for babies


In contrast this one isn't as easy to move in but gosh isn't it gorgeous...and if you baby is too young to move anyway then don't let that put you off!! I love the colours in the wing and guess this could be adapted into an owl as well

Flamingo


Every time I see this costume I just start singing "Because I'm happy..." and isn't that just what your little one should make you want to sing


If I ever get pregnant I'll be suffering from withdrawal symptoms from sushi - so much so I might end up making this costume whist pregnant!

DIY sushi Halloween costume for babies


This costume is too cute but I can see it being a bit frustrating for your little one when they can't move any more


Gizmo is the perfect choice for all those who get geeky over movies. This costume is super cute and will keep your baby cosy in the cold autumn weather (or at least it is cold for us Scottish folk!!)

GIZMO - Homemade costumes for babies


and I couldn't show Gizmo without sharing this cutie! Marshmallow man is one of the more difficult costumes on my list but I think you'll agree the results are worth it


Have another bun in the oven? Well this is a cute way to match yourself to your wee one so that both kids can take part in the fun

skeleton siblings


And if you want to go all out then start sourcing those feathers and get crafting to make this piece of art. 
You're baby would definitely be belle of the ball!!


I'll be back,

About This Blog

About This Blog
A blog for fun and unusual Craft tutorials This year I will be learning a new craft every month - if there is a craft you would like to learn, let me know

Search This Blog

Featured Post Via Labels

Instagram Photo Gallery